The most significant upgrades to your Hi-Fi system are free; they are your setup, your attention, and your listening skills, not more expensive gear.
- Perfect stereo imaging comes from precise speaker placement (the “equilateral triangle”), which costs nothing to implement.
- Distinguishing high-resolution audio is a trainable skill, transforming listening from a passive to an active engagement.
- Your room’s acoustics and your listening position have a greater impact on sound quality than a new amplifier or DAC.
Recommendation: Before spending another dollar on equipment, invest your time in mastering speaker placement and consciously building a listening ritual.
In a world of infinite playlists and disposable earbuds, the art of dedicated listening feels like a forgotten ritual. You’ve graduated from Bluetooth speakers, you crave something more immersive, but every audiophile forum seems to suggest you need a second mortgage to get “good sound.” The conversation inevitably turns to esoteric cables, five-figure amplifiers, and speakers carved from mythical woods. This is the path to “Gear Acquisition Syndrome” (GAS), a cycle of endless upgrades that promises sonic nirvana but often delivers only a lighter wallet. It’s a frustrating barrier for anyone who simply loves music and wants to experience it with clarity and depth.
But what if the entire premise is wrong? What if building a truly moving, high-fidelity system for under $1,000 isn’t about chasing the best components, but about reclaiming the *experience* of listening? The secret shared by veteran audiophiles is that once a certain baseline of quality is met—a threshold easily achieved with a smart $1,000 budget—the most profound improvements don’t come from a credit card. They come from understanding sonic geometry, training your ears, and treating the act of listening with the same intention a musician brings to their instrument. This isn’t about compromise; it’s about focus.
This guide is built on that principle. We will explore how the physical act of playing a record can change your brain, how to manipulate geometry to build a holographic soundstage in your room, and why the biggest enemy to your audio bliss might just be your refrigerator. We will deliberately leave the gear recommendations for later, because the foundation of great sound is built with knowledge, not money. Prepare to transform your room into a sanctuary for sound, using your ears and your mind as the primary tools.
This article will guide you through the essential steps, from the psychology of listening to the practical physics of sound in your space. Here is the path to your personal audio nirvana, on a budget that respects your passion and your bank account.
Summary: Building Your Sub-$1,000 Temple of Sound
- Why Does the Physical Act of Flipping a Record Change How You Listen?
- How to Use the “Equilateral Triangle” Rule for Perfect Stereo Imaging?
- FLAC or MP3: Why Is Learning Violin After 30 Considered the Ultimate Musical Challenge?
- The “GAS” Trap: Why Buying More Gear Won’t Make the Music Better?
- When to Turn Off Your Fridge to Hear the Silence in Classical Recordings?
- 2 Inputs vs 8 Inputs: Which Interface Do You Really Need?
- How to Position Yourself in a Venue for the Best Sonic Experience?
- How to Archive Your Digital Music Collection Before Hard Drives Fail?
Why Does the Physical Act of Flipping a Record Change How You Listen?
In our hyper-connected digital age, music has become auditory wallpaper. We “listen” while we work, drive, or scroll through feeds. The music is present, but we are not. The vinyl revival, often dismissed as hipster nostalgia, is actually a powerful rebellion against this passive consumption. The physical act of playing a record—selecting it from the shelf, cleaning the surface, gently lowering the stylus, and, crucially, getting up to flip it over every 20 minutes—is not an inconvenience. It is the entire point. It forces a shift from passive hearing to active, dedicated listening.
This process creates a deliberate ritual. It carves out a finite block of time dedicated solely to the music. You can’t just hit “play” and forget it. A recent analysis frames this beautifully, suggesting the analog process is a form of forced mindfulness. This deliberate ritual turns music consumption into a meditative act, which some studies suggest can significantly reduce stress. You are not just consuming content; you are participating in a ceremony. Placing your phone in another room, dimming the lights, and sitting in your designated “sweet spot” are all part of this pre-listening ritual. They are signals to your brain that this time is different, this is time to focus and immerse.
The 20-minute limit of a record side is a brilliant constraint. It perfectly matches the natural arc of human attention. It encourages you to listen to an album as a complete work, in the sequence the artist intended. This act of flipping the record is a physical punctuation mark, a moment to reset and re-engage. It transforms the listening experience from an endless, algorithm-driven stream into a series of intentional, deeply rewarding sessions. You are no longer a passive consumer but the conductor of your own auditory experience, and this mental shift is more impactful than any equipment upgrade.
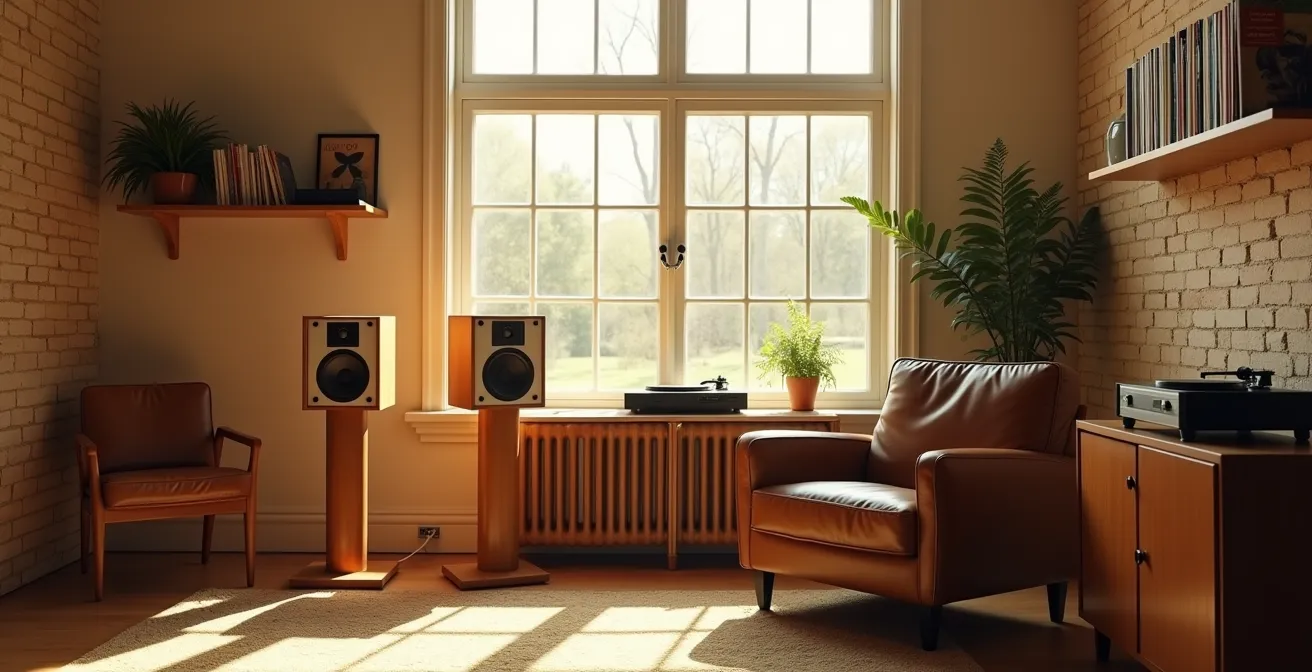
How to Use the “Equilateral Triangle” Rule for Perfect Stereo Imaging?
If the listening ritual is the “why” of Hi-Fi, then speaker placement is the most critical “how.” It is the single greatest, completely free upgrade you can give your system. The goal is to create a “phantom center”—the illusion that a vocalist is standing directly between your two speakers. This magical effect, known as stereo imaging, is achieved through a simple principle of sonic geometry: the equilateral triangle. Your two speakers and your head should form the three points of a perfect triangle, with each point equidistant from the others.
Imagine your speakers as two spotlights. If they are too close together, the sound is a confused, narrow mono beam. If they are too far apart, you get two distinct sound sources with a gaping hole in the middle. But when positioned correctly, their beams of sound converge precisely at your listening position, creating a three-dimensional soundstage. This is where music transcends the speakers and fills the space in front of you, with instruments appearing in distinct locations. This is the magic you are chasing.

Achieving this requires patience and experimentation, not expensive tools. Small adjustments can yield dramatic results. “Toeing in” the speakers—angling them slightly toward your ears—can sharpen the focus of the center image. Moving them closer to or further from the wall behind them will drastically alter the bass response. Your ears are the ultimate measuring device. The process of fine-tuning is an education in itself, teaching you to listen critically to the interaction between your system and your room.
Your Action Plan: Fine-Tuning Your Triangle Setup by Ear
- Start with speakers 6-8 feet apart and your chair forming an approximate equilateral triangle.
- Play a familiar mono recording (many classic Beatles or jazz tracks work well) to test for a solid “phantom center” image.
- Adjust the toe-in angle of the speakers in small increments until the vocals sound like they are locked directly in front of you, not coming from the speakers themselves.
- Move the speakers forward and backward by a few inches at a time to find the spot where the bass is tight and defined, not boomy or thin.
- Check the tweeter height. Ideally, the tweeters (the smallest drivers on your speakers) should be at the same height as your ears when you are seated.
- Once you find the perfect spot, mark the speaker positions on the floor with small pieces of tape for a consistent, repeatable setup.
FLAC or MP3: Why Is Learning Violin After 30 Considered the Ultimate Musical Challenge?
This section’s title is not a mistake. It frames the debate between lossless audio (like FLAC) and compressed audio (like MP3) in the correct context. The question isn’t simply “which is better?”—technically, FLAC is unequivocally superior as it contains all the original musical data. The real question is, “Can *you* hear the difference?” Just as learning a complex instrument like the violin as an adult is a profound challenge of muscle memory and aural acuity, training your ears to perceive the subtleties between audio formats is a learnable skill. It is the ultimate musical challenge for the listener, not the musician.
Compressed formats like MP3 work by discarding parts of the audio signal deemed “inaudible” by psychoacoustic models. This is what makes the files smaller. For background listening on a noisy bus, these compromises are imperceptible. But in a quiet, dedicated listening room, on a decent system, those discarded bits are exactly where the magic lives. They contain the subtle decay of a cymbal, the sense of air and space around an instrument, and the micro-dynamics that make a performance feel alive. Losing them can make the music feel flat and two-dimensional.
However, simply switching to FLAC files won’t magically reveal these details if your ear isn’t trained to listen for them. A fascinating 30-day ear training challenge showed that with structured practice, a majority of participants (78%) could learn to reliably distinguish between formats. They did this by focusing on specific elements: the shimmer of cymbals in Week 1, the perception of depth in Week 2. This proves that critical listening is a skill you cultivate, not an innate talent. It’s an active pursuit, much like an athlete training for a sport.
This table illustrates the technical trade-offs, but remember, the real difference is heard, not read. Use it as a guide for your own ear-training journey.
| Format | Bitrate | File Size (4min song) | Frequency Response | Best Use Case |
|---|---|---|---|---|
| FLAC | 800-1400 kbps | 25-35 MB | Full spectrum (20Hz-20kHz) | Dedicated listening sessions |
| MP3 320 | 320 kbps | 9-10 MB | Limited above 16kHz | Portable/background listening |
| MP3 128 | 128 kbps | 3-4 MB | Cuts at 15kHz | Voice/podcasts only |
The “GAS” Trap: Why Buying More Gear Won’t Make the Music Better?
Welcome to the audiophile’s biggest psychological hurdle: Gear Acquisition Syndrome, or “GAS.” It’s the nagging feeling that your system is just one component away from perfection. It’s the voice that whispers, “If only I had that new DAC, *then* the music would sound amazing.” This is a trap, fueled by marketing and online forums where enthusiasts compare equipment like trading cards. The truth is, beyond a certain point of quality—a point a well-chosen $1,000 system easily surpasses—buying more gear yields diminishing returns. The music doesn’t get better; your bank account just gets lighter.
The cure for GAS is not more gear; it’s more music. It’s shifting your focus from the hardware to the software. Instead of saving for a new amplifier, set a budget for discovering new albums. Explore a genre you’ve never listened to. Buy a high-quality pressing of a favorite record. This re-engages the part of your brain that fell in love with music in the first place. You’ll begin to test your system with new, challenging recordings, discovering its strengths and learning its character, rather than constantly focusing on its perceived flaws. The legendary audio writer Steve Guttenberg has built a career on this philosophy. As he often notes, the biggest upgrades are the ones that are free or low-cost.
His perspective is a grounding force in a hobby that can easily spiral into obsession. In a discussion on budget audio, Guttenberg’s sentiment is clear, as highlighted on platforms like The Audiophiliac YouTube Channel:
Once a certain quality threshold is met (which a $1,000 system does), the biggest upgrade available is improving one’s own listening skills, room acoustics, and mindset, all of which are free or low-cost.
– Steve Guttenberg, The Audiophiliac YouTube Channel
This is the core of the budget audiophile’s creed. Your listening room’s acoustics, your speaker placement, and your own ability to listen critically will always have a greater impact on the final sound than the difference between two competently designed $500 amplifiers. Focus on the free upgrades first: your position, your room, and your attention. Escaping the GAS trap means realizing your system is not a destination; it’s a vehicle for exploring the vast world of music.
When to Turn Off Your Fridge to Hear the Silence in Classical Recordings?
After you’ve perfected your listening ritual and speaker placement, the next frontier in your sonic quest is the room itself. Specifically, you must confront the hidden enemy of high-fidelity sound: the ambient noise floor. This is the collection of sounds your brain normally filters out—the hum of the refrigerator, the buzz of a fluorescent light, the whir of a computer fan. In daily life, this noise is unnoticeable. But in the quietest passages of a classical piece or the space between notes in a jazz recording, this noise floor becomes a dirty canvas that obscures fine detail. The silence in music is just as important as the notes, and if your room isn’t quiet, you’re missing half the performance.
The question in the title is not entirely facetious. For a truly critical listening session, an astonishing number of audiophiles will indeed turn off their refrigerators and HVAC systems. Why? Because these appliances create a low-frequency hum that can mask the subtle spatial cues and deep bass details in a recording. For truly great Hi-Fi, acoustic measurement experts recommend an ambient noise level of 30-35 dB SPL at most. A quiet suburban home at night is about 40 dB; your refrigerator alone can add 5-10 dB.

This image is a perfect metaphor. The dust motes in the light are like the ambient noises in your room—always there, but only visible when you shine a light on them. Critical listening shines that light. Before you spend a dime on acoustic panels, conduct a simple experiment. Sit in your listening chair with your system off, close your eyes, and just listen. Identify every sound. The hum from your electronics? Plug them into a power strip you can switch off. The rattle in the window frame? A piece of foam can fix that. Lowering the noise floor is a free, powerful upgrade. It allows the quietest, most delicate details of your music to emerge from the darkness, revealing a layer of realism you never knew was there.
2 Inputs vs 8 Inputs: Which Interface Do You Really Need?
Now that we’ve established the foundations, let’s talk about the heart of your system: the amplifier. When you’re on a budget, you’ll be faced with a choice. On one side, you have AV receivers loaded with features: 8+ inputs, Bluetooth, Wi-Fi, and processing for 7.1 channels of surround sound. On the other, you have a simple, two-channel integrated amplifier with maybe two or three inputs. For the budding audiophile, the choice is clear but counter-intuitive: less is almost always more. You are building a system for music, not for blockbuster movies.
An AV receiver in the sub-$1,000 price range is a master of none. The manufacturer’s budget is spread thin across dozens of features, licensing fees for surround formats, and multiple, lower-quality amplifier channels. An integrated amplifier, by contrast, has one job: to cleanly amplify two channels of audio. The entire engineering budget is focused on a high-quality power supply, better components in the signal path, and superior input stages. An analysis of budget amplifiers consistently shows that models with just 2-3 dedicated inputs outperform their multi-input counterparts. The simplicity of operation is not a bug, it’s a feature that enhances the listening ritual.
For a sub-$1,000 system, your needs are simple. You likely need one input for a turntable (a “Phono” input) and one for a digital source like a DAC or CD player (a “Line” or “Aux” input). That’s it. You don’t need to pay for four extra inputs you’ll never use, especially when that cost comes at the expense of sound quality on the two inputs that matter. Choosing a simple, high-quality integrated amp is a core tenet of the budget audiophile philosophy. It prioritizes the quality of the sound over the quantity of features.
This table breaks down the fundamental differences. For pure music listening, the dedicated 2-channel integrated amplifier is the clear winner in terms of value and sonic performance.
| Feature | 2-Channel Integrated | 5.1 AV Receiver |
|---|---|---|
| Price Range | $300-500 | $380-600 |
| Power per Channel | 50-100W | 70-100W (2ch mode) |
| Input Quality | Higher grade components | More inputs, lower quality |
| Setup Complexity | Simple, one button | Complex menus |
| Best For | Pure music listening | Mixed use/future expansion |
How to Position Yourself in a Venue for the Best Sonic Experience?
In the world of Hi-Fi, your room is not just a room; it is the venue. And your listening chair is not just a piece of furniture; it is your ticket to the best seat in the house. This shift in perspective is crucial. Just as the sound in a concert hall varies dramatically from the front row to the back balcony, the sound in your listening room changes with every foot, and every inch, you move. You’ve already positioned your speakers in a perfect equilateral triangle. Now, you must position the final, most important component: yourself.
Where is the “sweet spot” in your venue? A common starting point recommended by acousticians is the “38% rule.” For a rectangular room, your chair should be positioned 38% of the room’s length away from the front wall (the wall your speakers are on). This location often helps to minimize the negative effects of “room modes”—bass frequencies that get unnaturally boosted or cancelled out at specific points in the room. From this starting point, small movements of six inches forward or backward can fine-tune the bass response and soundstage depth to your liking. It’s a process of discovery, crawling around your room while playing a bass-heavy track to literally find where the bass sounds best.
The chair itself is a critical, yet often overlooked, component. A high-backed leather chair might look stately, but it’s an acoustic disaster. The high back will block sound coming from behind you and create early reflections right next to your ears, smearing the stereo image. The experts at GIK Acoustics, a leader in room treatment, put it perfectly in their setup guides. Their advice is a mantra for any serious listener.
Your Room is the Venue, Your Chair is the Ticket. The unspoken rule of seating: a chair with a low back (not blocking your ears), made of non-resonant material, is a critical yet overlooked component for clear imaging.
– GIK Acoustics, Hi-Fi Listening Room Setup Guide
Think of it: you’ve spent all this time carefully setting up your system to create a precise 3D sound field, only to place a giant reflective obstacle right in the middle of it. Opt for a simple chair with a low back, made of absorptive materials like fabric. Your listening venue deserves a proper throne, one designed for sonic clarity, not just comfort. This final positioning completes the circuit between the music, the system, and the listener.
Key Takeaways
- Building a great Hi-Fi system is more about knowledge and setup than budget.
- The biggest upgrades are free: speaker placement, lowering the room’s noise floor, and critical listening skills.
- Avoid the “Gear Acquisition Syndrome” (GAS) trap by focusing on discovering music, not just buying hardware.
How to Archive Your Digital Music Collection Before Hard Drives Fail?
You’ve embraced the ritual, perfected your setup, and trained your ears. You’ve spent countless hours curating a digital music collection of high-resolution FLAC files. This library is now the lifeblood of your Hi-Fi system. But it’s all sitting on a single hard drive. This is the digital equivalent of storing your entire record collection in a damp basement. It’s not a question of *if* a hard drive will fail, but *when*. Protecting this carefully curated collection is the final, crucial step in securing your investment of time and passion.
The gold standard for data protection is the 3-2-1 backup rule: have at least 3 copies of your data, on 2 different types of media, with 1 copy stored offsite. This sounds complex, but for a music collection, it’s very achievable on a budget. For a typical digital library, storage calculations show that a 1TB drive can hold around 2,500 FLAC albums, a significant collection that warrants protection. A case study for implementing the 3-2-1 rule on a 500GB FLAC collection shows a simple, effective path: the primary copy lives on your computer’s main drive (Copy 1, Media 1). A second copy is made to an inexpensive external USB hard drive (Copy 2, Media 2). The crucial third, offsite copy can be achieved with a cloud backup service like Backblaze or by simply keeping a second external drive at a trusted friend’s house or your office (Copy 3, Offsite).
This strategy protects you from every likely disaster. A computer virus or software error? You have the external drive. A fire or theft at your home? Your offsite copy is safe. Setting this up is not a one-time task; it’s a simple, automated process. Many backup software solutions can automatically sync your music folder to your external drive and the cloud whenever changes are made. For under $100 per year for cloud storage and an external drive, you can ensure your priceless music collection is effectively immortal.
Once your collection is secure, you can even take it a step further. A low-cost, silent computer like a Raspberry Pi, costing under $100, can be set up as a dedicated, always-on music server. This small device can access your main collection over your home network, providing a silent, efficient, and dedicated “source” for your Hi-Fi system, completing the journey from a fragile digital library to a robust, accessible, and protected musical heart.
Now that you have the knowledge to build a system that prioritizes listening over spending, the next logical step is to start your journey. Begin not by shopping, but by evaluating your own space and practicing these techniques. Your path to audio nirvana has already begun.